 EV INITIATIVE
EV Initiative / Buyer · Sales Partner · Electrician · Factory technician
From delivery to your first charge.
Register the deployment before programming the hardware. Each charger gets its own credentials, then each plug is tested at the site before an operator approves launch.
Fastest install: order pre-programmed chargers from evinitiative.shop. They arrive ready to connect. You still register the install so we can test and launch it.
The shop lists pre-commissioning to the network on its DC chargers. For AC models, ask EVI before you order whether your units can be programmed before they ship. Home chargers are registered in My Home first, then connected over Wi-Fi with the Autel app. For those, use the residential host guide.
1. Arrange access before the work starts
Buying a charger does not automatically give someone installer access. Ask your EVI contact or Sales Partner to arrange the correct account and assign the deployment to the person who will program and test the hardware.
- Buyer / site contact: provide the site address, contact details, intended public/private/fleet access, and who should receive electricity reimbursement.
- Sales Partner: sign in with your partner account and complete any required partner terms.
- Installer or factory technician: use your own active account. An operator assigns it by email; sharing this guide or a deployment link does not grant access.
- Before ordering: buy new hardware through evinitiative.shop. The hardware purchase guide covers ordering, lead times and arrival. For any other unit, confirm with EVI that the model supports the EVI OCPP connection settings below and that its configuration tool allows you to enter a username and password. Obtain the manufacturer's setup instructions.
Have the exact charger identities, manufacturer/model, physical plug count and types, power rating, site details and free/paid charging intent ready. Keep the identity printed on each unit consistent with its configured OCPP identity.
2. Choose how each charger connects
Each charger reaches the network one of two ways. The installer and the location choose what suits the site.
- Site WiFi or ethernet
- Uses the site's own network, with no data cost. Best for underground or garage installs where the site network reaches the charger well.
- EV Initiative cellular data
- Uses a SIM we supply. The charger owner is billed $20 per data top-up, which typically lasts 3 to 4 months per charger.
3. Register once, then open commissioning
- Manage → Register Install
- The Sales Partner wizard for an existing or new customer, their location, and its chargers.
- Manage → Submit a Location
- The location submission form available to Sales Partners and fleet managers. Use this when it fits your site submission. Do not submit the same deployment through both forms.
- Manage → Deployment commissioning
- Return here for programming cards, connection status, per-plug tests and launch readiness. Assigned installers use the existing deployment; they do not register it again.
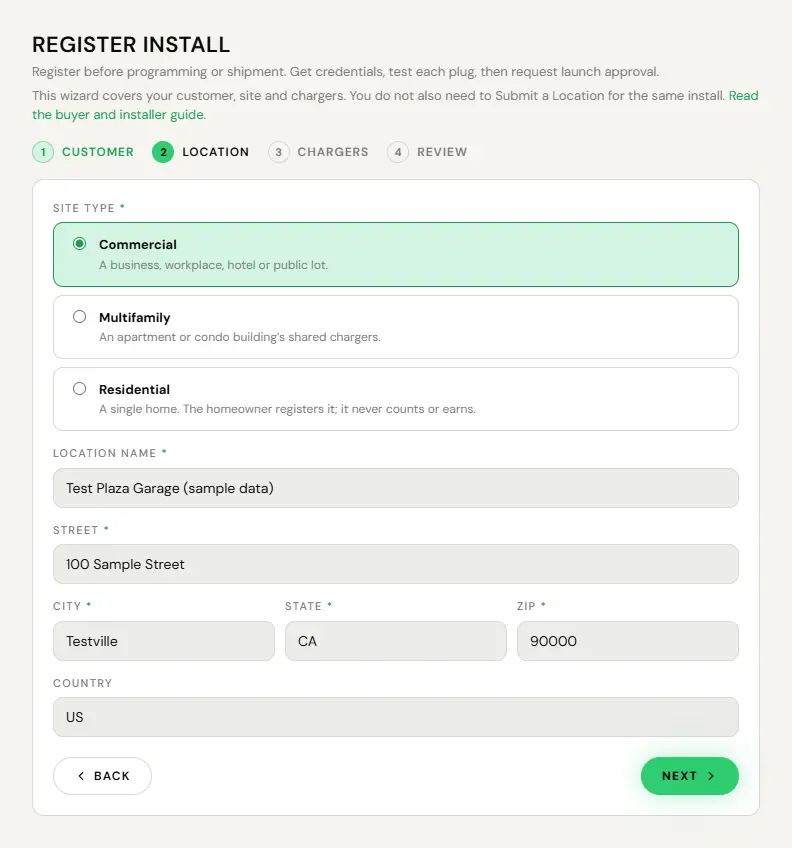
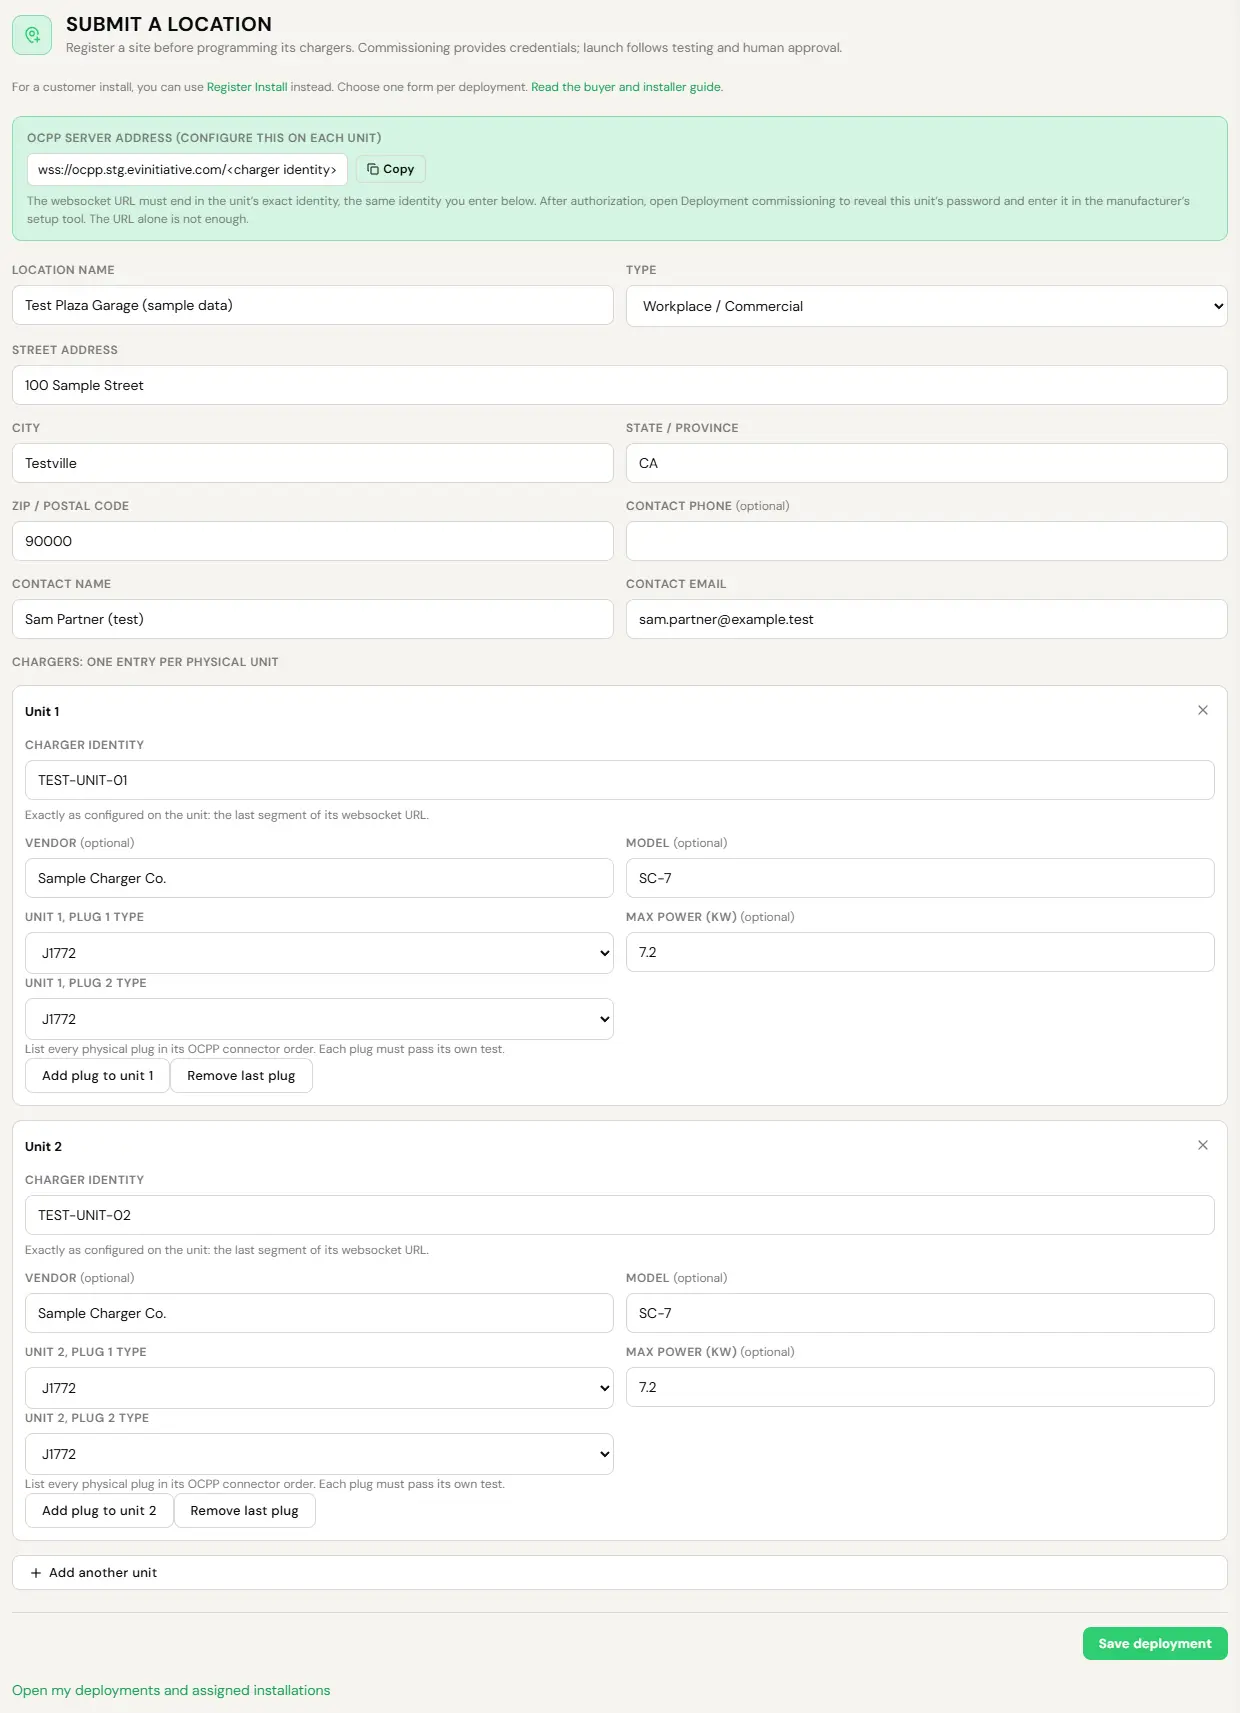
Each deployment supports up to 50 physical units and up to eight plugs per unit. Enter plugs in the manufacturer's OCPP connector order. A duplicate identity must be resolved with EVI; do not invent a different identity to bypass the warning.
A qualified, operator-reviewed Sales Partner with at least four deployed pay-to-use chargers receives commissioning authorization automatically. Other submissions wait for an operator to authorize commissioning. In either case, launch is a separate human approval.
4. Pre-programmed first, on-site second
Recommended: order from evinitiative.shop and ask EVI to arrange programming before the units ship. The site visit is then for installing and testing. Programming on-site is the second choice. Both paths use the same registration, commissioning authorization, installer assignment, connection checks, plug tests and human launch approval.
Pre-programmed (recommended)
- Before you order through evinitiative.shop, ask EVI whether it can arrange pre-programming. After ordering, give your EVI contact or Sales Partner the order number and the destination site.
- Get the final identities from the supplier. Register the deployment with those exact identities and obtain commissioning authorization before programming. A unit's EVI credentials exist only after this step.
- If EVI confirms pre-programming for your order, EVI assigns an authorized technician's account. The technician reveals and programs each unit's exact production settings on the signed-in page, as in section 5. If EVI cannot arrange it, follow the on-site path.
- Before shipping, retain the identity-to-unit labels. Keep the units in commissioning.
- After delivery, EVI assigns the on-site installer for final checks. A deployment has one installer assignment, so this ends the technician's access. Confirm installer access is still valid.
- At the site, keep the programmed settings. Power up, watch the connection checks and complete every plug's tests.
Programmed on-site (second choice)
- Register and authorize before the appointment whenever the identities are known.
- The assigned installer opens each programming card on-site, as in section 5.
- Enter that card's settings in the manufacturer's tool, save and reconnect.
- Watch the connection checks and complete every plug's tests.
The shop lists pre-commissioning to the network on its DC chargers. For other models, ask EVI before you order whether the units can be programmed before they ship. Units registered after delivery are programmed on-site.
If a unit already holds the exact EVI credentials shown on its card, keep them and verify the connection. A factory default password or a legacy server address is not proof of EVI v3 provisioning.
A connection made before shipment still counts. The heartbeat must be current at launch, and the plug-in and label tests happen at the installed location. A firmware update or a password rotation means repeating that unit's affected checks. Installer access lasts 30 days at a time, so ask EVI to extend it if freight or scheduling pushes the site visit later.
Pre-programming is a coordinated handoff through signed-in accounts. There is no automatic factory provisioning integration or shared credential spreadsheet.
5. Reveal and program the auth password
Once authorized, open the deployment and find the card for the unit in front of you. Select Reveal for 60 seconds, then Copy password. Enter the settings in the manufacturer's setup app or the charger's local configuration page.
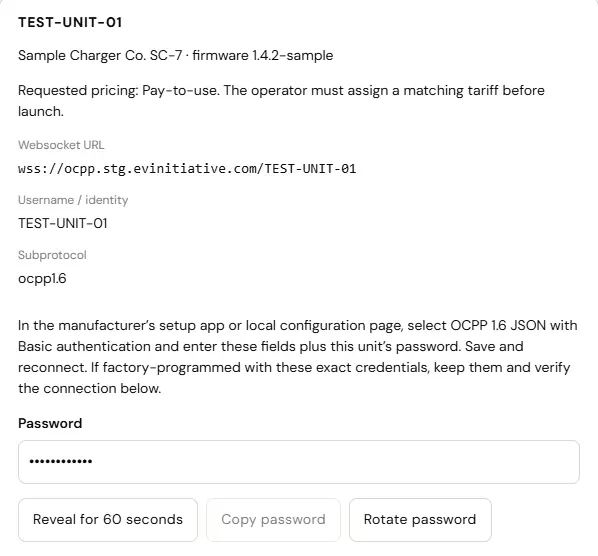
- Protocol
- OCPP 1.6 JSON over secure WebSocket; subprotocol
ocpp1.6. - Server / connection URL
- Copy the full URL from that unit's card. Production:
wss://ocpp.evinitiative.com/<identity>
Staging tests:wss://ocpp.stg.evinitiative.com/<identity> - Charge point identity / Basic-auth username
- The exact identity on the card, including capitalization.
- Basic-auth password / auth key
- The per-unit password revealed on that card. It is separate from your account password. Never reuse one unit's password on another.
Some manufacturer tools ask for a base server URL and a separate charge point identity and append the identity themselves. Others accept the full URL. Follow that model's instructions so the final connection URL matches the card exactly, with the identity included once.
Save the settings and reconnect using the manufacturer's instructions. Adding the record in Admin does not write these settings into an offline charger.
Passwords are available only through the authorized signed-in screen. They are not sent by email or returned by the MCP. Share the guide and deployment link, not screenshots or messages containing passwords.
6. Verify the installed unit and every plug
The deployment page checks credentials issued, password-authenticated connection, BootNotification, a heartbeat within five minutes, and every configured connector being reported. An online charger is still in commissioning until launch.
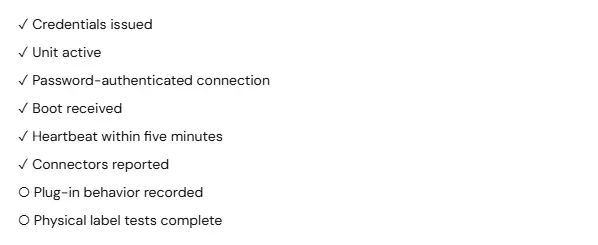
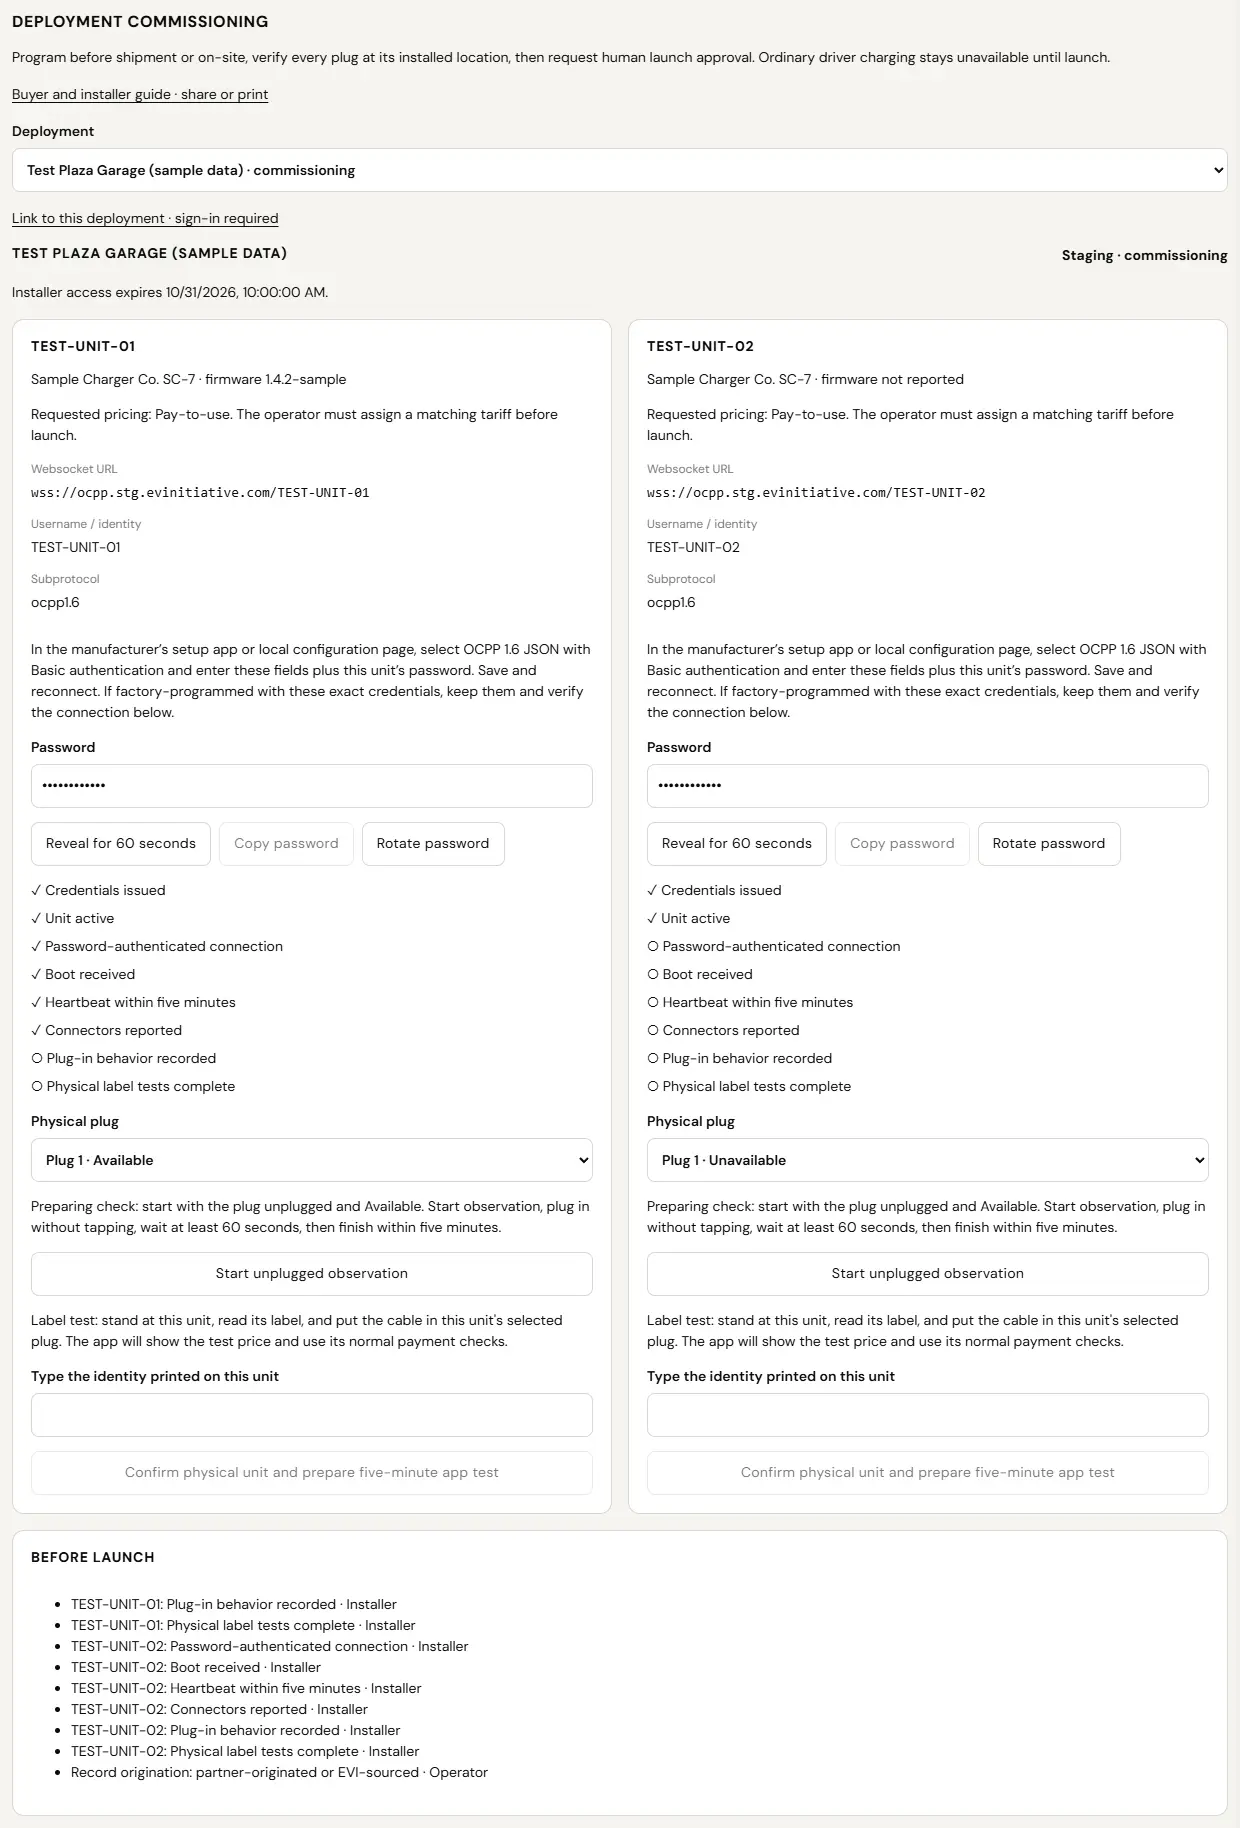
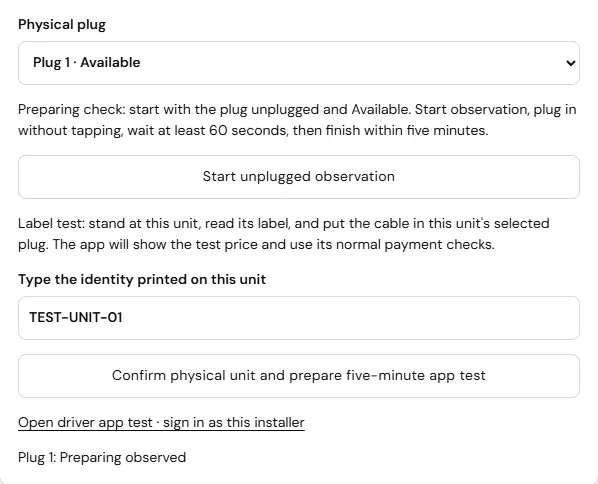
Record plug-in behavior
Select the physical plug. Start with it unplugged and Available, select Start unplugged observation, then plug in without starting a session. Wait at least 60 seconds and finish the observation within five minutes. The platform records whether this unit reports Preparing.
Confirm the label with an app test
At that unit, read and type its printed identity, put the cable in the selected plug, and prepare the five-minute app test. Open the provided driver-app link and sign in as the same assigned installer. Check the displayed price and start the test. Normal payment checks apply; a test is not automatically free.
Finish a session that delivers energy. Repeat for every physical plug. The completed test must appear on the deployment page. These steps prove that the unit and plug shown in the app match the hardware being used.
7. Complete readiness and hand over
The deployment's Before launch list shows what remains and who owns each item. An operator completes the location coordinates, matching free/paid tariff, driver access settings and origination record, and assigns a fleet when access is fleet-only. Where idle fees apply, a grace period of 5 to 30 minutes is required and the maximum is $2 per minute. Owner Program locations also need verified site bank readiness for electricity reimbursement.


When all checks pass, an operator approves launch. Ordinary charging becomes available under the chosen access policy. Public sites can appear to public drivers; private and fleet sites remain limited by their access rules.
Installer credential access is temporary and available during commissioning. If installation is delayed, ask EVI to renew access. Rotating a password requires reprogramming the hardware and repeating affected connection and test checks. After launch, contact EVI for credential changes.
Existing legacy chargers are handled separately. Do not change a working legacy unit's server or authentication settings using this new-install guide unless EVI has arranged its migration.
If you cannot continue
- No account, no menu, or no assigned deployment
- Contact EVI or your Sales Partner with your account email and deployment name. Ask for the correct v3 Admin address and installer assignment. Account invitations and purchase fulfillment are separate from registration.
- No programming cards yet
- A pending deployment needs operator commissioning authorization. An expired assignment needs renewal. Do not create a duplicate submission.
- Password works nowhere / connection is missing
- Check the environment, full URL, identity, Basic-auth username/password and OCPP version in the manufacturer's tool. Confirm network access and check the charger's local connection error. Never send the password with a support request.
- Online but ordinary charging is refused
- This is expected during commissioning. Use the assigned installer's app test, complete readiness and request human launch approval.
- A label test or launch check fails
- Keep the unit in commissioning. Share the deployment link, identity, plug number and error message with EVI so the exact issue can be resolved.